# PiSA-SR Image Upscaler — AI Image Upscaling & Restoration (`danitn11/pisa-sr-image-upscaler`) Actor
Upscale and restore any photo with PiSA-SR AI image upscaling. Sharpen blurry, low-res, and compressed images to a 1–2 megapixel target in seconds, from $0.012/image. No GPU or subscription — a pay-as-you-go Topaz alternative.
- **URL**: https://apify.com/danitn11/pisa-sr-image-upscaler.md
- **Developed by:** [daniel tr](https://apify.com/danitn11) (community)
- **Categories:** Automation, Developer tools, Social media
- **Stats:** 3 total users, 1 monthly users, 66.7% runs succeeded, 0 bookmarks
- **User rating**: No ratings yet
## Pricing
from $12.00 / 1,000 image upscaleds
This Actor is paid per event. You are not charged for the Apify platform usage, but only a fixed price for specific events.
Since this Actor supports Apify Store discounts, the price gets lower the higher subscription plan you have.
Learn more: https://docs.apify.com/platform/actors/running/actors-in-store#pay-per-event
## What's an Apify Actor?
Actors are web data automations that power AI and operations. They run on the Apify platform to scrape websites, process data, connect APIs, and automate workflows.
In Batch mode, an Actor accepts a well-defined JSON input, performs an action which can take anything from a few seconds to a few hours,
and optionally produces a well-defined JSON output, datasets with results, or files in key-value store.
In Standby mode, an Actor provides a web server which can be used as a website, API, or an MCP server.
Actors are written with capital "A".
## How to integrate an Actor?
If asked about integration, you help developers integrate Actors into their projects.
You adapt to their stack and deliver integrations that are safe, well-documented, and production-ready.
The best way to integrate Actors is as follows.
- **AI agents and MCP clients** — the [Apify MCP server](https://docs.apify.com/integrations/mcp.md) at `https://mcp.apify.com` (remote, streamable HTTP, OAuth on first use).
- **Agentic workflows and local Actor development** — [Agent Skills](https://apify.com/.well-known/agent-skills/index.json) with the [Apify CLI](https://docs.apify.com/cli/docs.md): `npm install -g apify-cli`, then `apify login`.
- **JavaScript/TypeScript projects** — the official [JS/TS client](https://docs.apify.com/api/client/js/docs.md): `npm install apify-client`.
- **Python projects** — the official [Python client](https://docs.apify.com/api/client/python/docs.md): `pip install apify-client`.
- **Any other language** — the [REST API](https://docs.apify.com/api/v2.md).
For usage examples, see the [API](#api) section below.
For more details, see Apify documentation as [Markdown index](https://docs.apify.com/llms.txt) and [Markdown full-text](https://docs.apify.com/llms-full.txt).
# README
## PiSA-SR Image Upscaler — AI Image Upscaling & Photo Restoration 🔍
**Turn blurry, low-res, and compressed images into sharp high-resolution ones** with **PiSA-SR**, a state-of-the-art one-step diffusion upscaling model. Get a clean, detailed **1–2 megapixel** result in **just a few seconds**. No GPU, no subscription, no monthly fees: you pay a tiny fixed price per image. A fast, affordable **alternative to Topaz Gigapixel, Magnific, and Let's Enhance**.
- 🔍 **Real detail, not just bigger pixels** — PiSA-SR reconstructs texture, edges, and fine structure instead of smoothing them away.
- 🎯 **Megapixel targeting** — ask for a pixel budget and the Actor sizes the output for you, always keeping the original aspect ratio.
- 🎨 **Color-faithful** — built-in color correction keeps the result true to the original.
Perfect for **rescuing old or low-res photos**, **e-commerce product shots**, print and poster work, thumbnails, scanned documents, upscaling AI-generated images, and **n8n / Make / Zapier** workflows and AI agents.
### See it in action
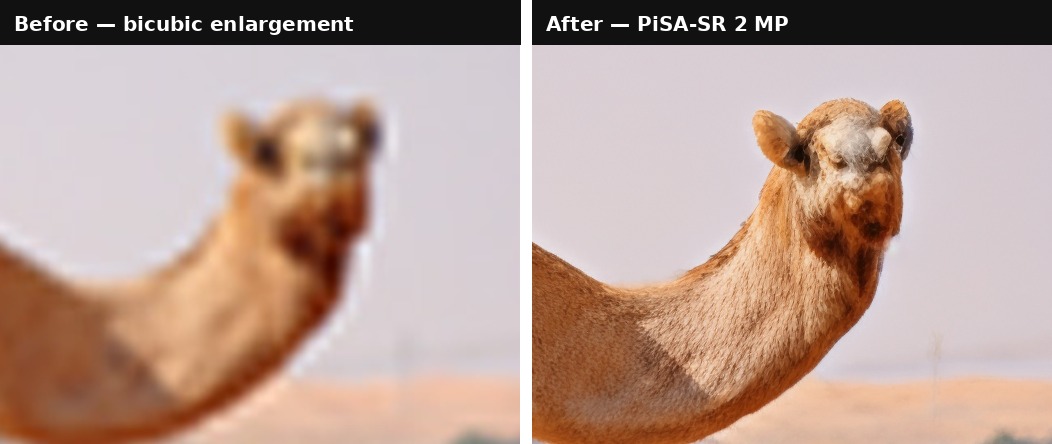
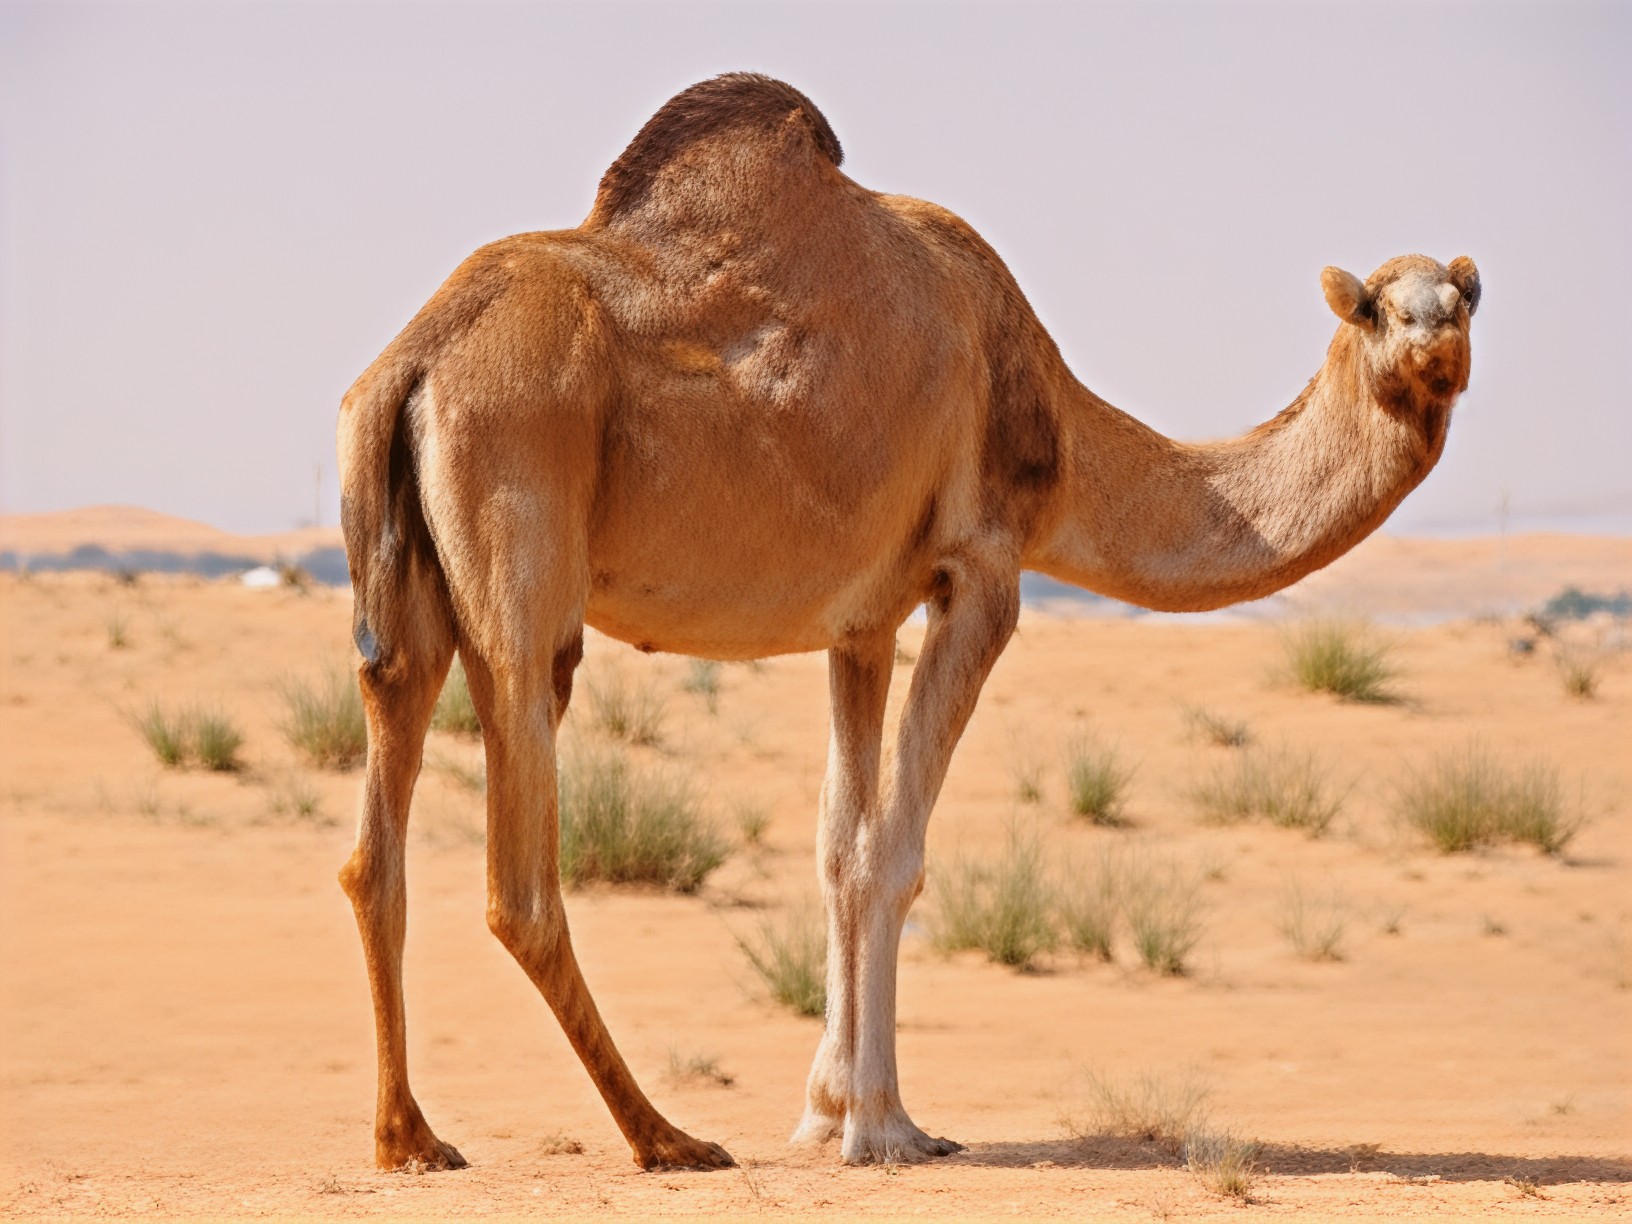
A **500×375** desert photo (0.19 MP, visibly soft) upscaled to **2 MP** — one run, default settings, about 8 seconds:
```json
{ "imageUrl": "https://example.com/camel-500x375.jpg", "outputResolution": "2mp", "outputFormat": "png" }
```
```json
{
"imageUrl": "https://api.apify.com/v2/key-value-stores/.../records/upscaled.png?signature=...",
"width": 1632,
"height": 1224,
"megapixels": 2,
"model": "pisa-sr"
}
```
> Both crops above are shown at 100% against a **bicubic enlargement of the same source to the same pixel count** — the fair comparison. Every "before" panel in this README is the original image enlarged conventionally, never a downscaled or artificially degraded one.
### Why this Actor?
- ⚡ **Fast** — PiSA-SR is a *one-step* diffusion model on dedicated GPUs: results in **3–10 seconds**, not minutes.
- 💸 **Cheap** — from **$0.012 per image** (as low as $12 per 1,000) — roughly **4× under Topaz's API** and **2× under Replicate's popular upscalers**. Pay only for successful results; failed runs are never charged.
- 📐 **One simple dial** — set the output size directly in megapixels, with no per-tier price hike.
- 🧼 **Restores, not just enlarges** — removes JPEG artifacts, blur, and noise on the way up.
- 🔌 **Automation-ready** — call it from the Apify API, n8n, Make, Zapier, LangChain, or any AI agent via MCP.
### How it compares
| | This Actor (PiSA-SR) | Topaz / Magnific / Let's Enhance |
| --- | --- | --- |
| Pricing model | Pay per image (from $0.012) | Subscription / credits, or $0.05+ per image |
| Commitment | None — pay only for what you run | Recurring plan, credits expire |
| Failed runs | Never charged | Often consume credits |
| Speed | 3–10 s (one-step diffusion) | Tens of seconds to minutes |
| Output sizing | Direct megapixel target | Fixed 2×/4×/6× factors |
| API & automation | Native Apify API, n8n, Make, Zapier, MCP | Varies / limited |
| Watermark | None | Common on lower tiers |
### How it works
1. Provide a public **image URL**.
2. Choose your **output resolution** (`1mp` or `2mp`) and **format** (PNG, JPEG, or WebP).
3. The Actor upscales the image and stores it in the run's dataset and key-value store.
4. Download the file from the output, or pipe the URL into the next step of your workflow.
The aspect ratio is always preserved — the megapixel target sets the total pixel budget. A 4:3 photo comes back as roughly 1152×864 at `1mp` and 1632×1224 at `2mp`.
Available tiers are `1mp`, `2mp`, `3mp`, `4mp`, `6mp`, and `8mp`.
> **On output resolution.** `1mp` and `2mp` are the tiers we recommend and support today — they're consistent across the photo, product, and artwork inputs we've tested. The larger tiers (`3mp`, `4mp`, `6mp`, `8mp`) are accepted, but output quality there is noticeably **input-sensitive**: some image domains aren't well covered by the model and can come back over-smoothed or with invented texture. Treat them as experimental. We're investigating and will lift the recommendation once results are dependable.
### Input example
```json
{
"imageUrl": "https://api.apify.com/v2/key-value-stores/V71avzkGoqNmwvwJy/records/sample-pet.jpg?signature=VIZK6maYv13xpsx1eTOv",
"outputResolution": "2mp",
"outputFormat": "png",
"colorFix": true
}
```
| Field | Type | Default | Description |
| --- | --- | --- | --- |
| `imageUrl` | string | — (required) | Public URL of the image to upscale (JPG, PNG, WebP). |
| `outputResolution` | string | `2mp` | Target size. `1mp` and `2mp` are recommended; `3mp`/`4mp`/`6mp`/`8mp` are accepted but experimental (see above). |
| `outputFormat` | string | `png` | Output file format — `png`, `jpeg`, or `webp`. |
| `colorFix` | boolean | `true` | Match the result's colors to the original image. |
### Output example
```json
{
"imageUrl": "https://api.apify.com/v2/key-value-stores/.../records/upscaled.png?signature=...",
"sourceImageUrl": "https://example.com/low-res.jpg",
"outputResolution": "2mp",
"outputFormat": "png",
"colorFix": true,
"width": 1632,
"height": 1224,
"megapixels": 2,
"requestId": "req-...",
"contentType": "image/png",
"model": "pisa-sr"
}
```
The upscaled image is also stored in the run's key-value store under the key `upscaled.png` (or `upscaled.jpg` / `upscaled.webp`).
### Pricing
You are charged **per upscaled image** at a price that drops with your Apify plan. **The price is the same at every output resolution** — 2 MP costs no more than 1 MP.
| Apify plan | Price per image | Per 1,000 images |
| --- | --- | --- |
| Free | $0.0200 | $20.00 |
| Bronze | $0.0180 | $18.00 |
| Silver | $0.0150 | $15.00 |
| Gold / Platinum / Diamond | $0.0120 | $12.00 |
That's roughly **4× cheaper than the Topaz upscaling API** (~$0.05/image) and about **2× cheaper than Replicate's Crystal/Clarity upscalers** (~$0.025/image), with **no monthly subscription and no expiring credits**.
**Failed runs are never charged** — you only pay for images you actually receive. (Apify also applies its standard tiny platform fees for the Actor start and each dataset record.)
### Tips for great results
- **Stay at 1–2 MP.** These are the supported tiers and give the most consistent results across image types. Higher targets are experimental and quality varies by subject.
- **Don't over-target.** Upscaling a 200×150 thumbnail invents detail. Aim for roughly 4–8× the source pixel count for the most natural result.
- **Feed the best source you have** — upscale from the original file, not from a re-compressed screenshot or a messaging-app copy.
- **Use PNG** when the result goes into further editing; **JPEG** when you just need a smaller file to publish.
- **Leave color correction on** unless you're deliberately after the model's raw output.
- **Batch it** by running the Actor once per image from n8n, Make, or a script — each run is independent and charged individually.
### ✂️ Pair it with BiRefNet Background Remover
Upscaled a product shot? **Cut it out next.** Our companion Actor, **[BiRefNet Background Remover](https://apify.com/danitn11/birefnet-background-remover)**, turns any image into a clean transparent PNG in seconds.
**The complete pipeline:**
```
Low-res product photo
→ PiSA-SR Image Upscaler (this Actor) → sharp high-res image
→ BiRefNet Background Remover → transparent cutout
→ list product / composite / post to social
```
👉 **[Try BiRefNet Background Remover →](https://apify.com/danitn11/birefnet-background-remover)**
### Use it from the API
```bash
curl -X POST "https://api.apify.com/v2/acts/danitn11~pisa-sr-image-upscaler/runs?token=YOUR_TOKEN" \
-H "Content-Type: application/json" \
-d '{ "imageUrl": "https://example.com/low-res.jpg", "outputResolution": "2mp", "outputFormat": "png" }'
```
Works the same from the [Apify n8n node](https://apify.com/integrations), Make, Zapier, LangChain, or the Apify MCP server for AI agents.
For the full request/response shape (run-sync, async, polling, downloading the image), see the OpenAPI spec at [`openapi.yaml`](./openapi.yaml) — import it into Postman, Insomnia, or any OpenAPI client.
### Templates & integrations
Drop this Actor into a no-code workflow to automate upscaling end to end. In each tool, search for the **Apify** connector, authenticate with your [Apify API token](https://console.apify.com/account/integrations), and select **`danitn11/pisa-sr-image-upscaler`** with the action **Run Actor** (or **Run Actor and get dataset items** to receive the image URL back).
- **n8n** — add the **Apify** node → *Run Actor*, map `imageUrl` from a previous step (e.g. a new row in a Sheet or an uploaded photo), then push the resulting `imageUrl` to your storage or publishing node.
- **Make.com** — use the **Apify › Run an Actor** module, then a *Watch / Get dataset items* module to read back `imageUrl`. Chain into Shopify, Google Drive, or an image uploader.
- **Zapier** — trigger (new file, form submission, etc.) → **Apify: Run Actor** → action (update a product listing, save to Drive, send a Slack message).
**Common pattern — automated catalog upgrade:**
```
Low-res catalog image (Sheet / form / webhook)
→ Run this Actor (imageUrl, outputResolution: "2mp")
→ Get upscaled imageUrl
→ Replace the asset in your store / CMS
```
### Use with AI agents (MCP server)
This Actor works as a tool for any MCP-compatible AI agent (Claude, Cursor, VS Code Copilot, custom agents) through [Apify's hosted MCP server](https://mcp.apify.com). Your agent can upscale images as part of a larger task — "make this product photo print-ready" — with billing through your Apify account.
**Server URL** (with this Actor preselected as a tool):
```
https://mcp.apify.com?tools=danitn11/pisa-sr-image-upscaler
```
Authenticate with OAuth (you'll be redirected on first connect) or an `Authorization: Bearer ` header.
**Claude Code**
```bash
claude mcp add --transport http apify "https://mcp.apify.com?tools=danitn11/pisa-sr-image-upscaler" -H "Authorization: Bearer "
```
**Claude Desktop / claude.ai** — add a custom connector with the server URL above (OAuth flow handles auth).
**Cursor / VS Code** — add to `.cursor/mcp.json` (or "MCP: Open User Configuration" in VS Code):
```json
{
"mcpServers": {
"apify": {
"url": "https://mcp.apify.com?tools=danitn11/pisa-sr-image-upscaler",
"headers": { "Authorization": "Bearer " }
}
}
}
```
**Local stdio (npx)**
```json
{
"mcpServers": {
"apify": {
"command": "npx",
"args": ["-y", "@apify/actors-mcp-server", "--tools", "danitn11/pisa-sr-image-upscaler"],
"env": { "APIFY_TOKEN": "" }
}
}
}
```
Then just ask your agent: *"Upscale this photo to 2 megapixels and give me a PNG."* The agent calls the Actor, waits for the result, and gets back the image URL from the output schema.
### FAQ
**How long does upscaling take?**
Typically 3–10 seconds. PiSA-SR is a one-step diffusion model, so it's far faster than the multi-step upscalers most tools use.
**What image formats are supported?**
Input: JPG, PNG, and WebP via a publicly accessible URL. Output: PNG, JPEG, or WebP.
**How much can it enlarge?**
The output is sized by megapixel target, not by a fixed factor — so the effective magnification depends on your source. A 0.1 MP thumbnail to `2mp` is a 20× pixel increase; a 1 MP photo to `2mp` is 2×. Modest targets give the most natural results.
**Why only 1–2 MP?**
Those are the tiers we've validated as consistently good. The model accepts targets up to `8mp`, but at those sizes quality depends heavily on the subject — some image domains aren't well covered yet and can come back over-smoothed or with invented detail. We're investigating; higher tiers will be recommended once they're dependable.
**Does 2 MP cost more than 1 MP?**
No. The price per image is flat across every resolution tier.
**Is there a watermark?**
No. The output is clean and ready to publish.
**Can it fix faces?**
PiSA-SR restores general detail including facial features, but it is a general-purpose upscaling model, not a dedicated face-restoration model.
**What model is used?**
PiSA-SR (`pisa-sr`) — Pixel-level and Semantic-level Adjustable Super-Resolution, a one-step diffusion model for real-world image super-resolution.
# Actor input Schema
## `imageUrl` (type: `string`):
Publicly accessible URL of the image to upscale (JPG, PNG, or WebP). Must be directly downloadable — no Google Drive share links, localhost, or auth-gated URLs. Example: https://api.apify.com/v2/key-value-stores/V71avzkGoqNmwvwJy/records/sample-pet.jpg?signature=VIZK6maYv13xpsx1eTOv
## `outputResolution` (type: `string`):
Target size of the result, as a total pixel budget. The original aspect ratio is always kept — e.g. a 4:3 photo at 1MP comes back as 1152×864, at 2MP as 1632×1224. Stick to 1MP or 2MP: those are the tiers we support and they give consistent results. The 3–8MP tiers are experimental — quality there depends heavily on the subject, since some image domains aren't well covered by the model yet (under investigation).
## `outputFormat` (type: `string`):
Image file format. PNG is lossless and best for further editing; JPEG is smallest; WebP balances both.
## `colorFix` (type: `boolean`):
Match the colors of the result to the original image. Leave on unless you want the model's raw output — upscaling can otherwise shift hue and saturation slightly.
## Actor input object example
```json
{
"imageUrl": "https://api.apify.com/v2/key-value-stores/V71avzkGoqNmwvwJy/records/sample-pet.jpg?signature=VIZK6maYv13xpsx1eTOv",
"outputResolution": "2mp",
"outputFormat": "png",
"colorFix": true
}
```
# Actor output Schema
## `image` (type: `string`):
The high-resolution image stored in the run's key-value store, ready to download or embed.
## `results` (type: `string`):
Dataset record with the image URL, output dimensions, and request ID.
# API
You can run this Actor programmatically using our API. Below are code examples in JavaScript, Python, and CLI, as well as the OpenAPI specification and MCP server setup.
## JavaScript example
```javascript
import { ApifyClient } from 'apify-client';
// Initialize the ApifyClient with your Apify API token
// Replace the '' with your token
const client = new ApifyClient({
token: '',
});
// Prepare Actor input
const input = {
"imageUrl": "https://api.apify.com/v2/key-value-stores/V71avzkGoqNmwvwJy/records/sample-pet.jpg?signature=VIZK6maYv13xpsx1eTOv"
};
// Run the Actor and wait for it to finish
const run = await client.actor("danitn11/pisa-sr-image-upscaler").call(input);
// Fetch and print Actor results from the run's dataset (if any)
console.log('Results from dataset');
console.log(`💾 Check your data here: https://console.apify.com/storage/datasets/${run.defaultDatasetId}`);
const { items } = await client.dataset(run.defaultDatasetId).listItems();
items.forEach((item) => {
console.dir(item);
});
// 📚 Want to learn more 📖? Go to → https://docs.apify.com/api/client/js/docs
```
## Python example
```python
from apify_client import ApifyClient
# Initialize the ApifyClient with your Apify API token
# Replace '' with your token.
client = ApifyClient("")
# Prepare the Actor input
run_input = { "imageUrl": "https://api.apify.com/v2/key-value-stores/V71avzkGoqNmwvwJy/records/sample-pet.jpg?signature=VIZK6maYv13xpsx1eTOv" }
# Run the Actor and wait for it to finish
run = client.actor("danitn11/pisa-sr-image-upscaler").call(run_input=run_input)
# Fetch and print Actor results from the run's dataset (if there are any)
print(f"💾 Check your data here: https://console.apify.com/storage/datasets/{run.default_dataset_id}")
for item in client.dataset(run.default_dataset_id).iterate_items():
print(item)
# 📚 Want to learn more 📖? Go to → https://docs.apify.com/api/client/python/docs/quick-start
```
## CLI example
```bash
echo '{
"imageUrl": "https://api.apify.com/v2/key-value-stores/V71avzkGoqNmwvwJy/records/sample-pet.jpg?signature=VIZK6maYv13xpsx1eTOv"
}' |
apify call danitn11/pisa-sr-image-upscaler --silent --output-dataset
```
## MCP server setup
```json
{
"mcpServers": {
"apify": {
"type": "http",
"url": "https://mcp.apify.com/?tools=fetch-actor-details,danitn11/pisa-sr-image-upscaler"
}
}
}
```
The hosted server signs you in with OAuth on first connect, so no API token belongs in this config. Clients without OAuth support can send an `Authorization: Bearer ` header instead, using a token from API & Integrations in Apify Console (https://console.apify.com/settings/integrations).
## OpenAPI specification
Download the OpenAPI definition: https://api.apify.com/v2/actors/zYq60K9BziPDdbSYq/builds/8gggBSmL1R9DThcL3/openapi.json