Intercom Help Center avatar

Intercom Help Center

Try for free

2 hours trial then $15.00/month - No credit card required now

Go to Store
Intercom Help Center

Intercom Help Center

canadesk/intercom
Try for free

2 hours trial then $15.00/month - No credit card required now

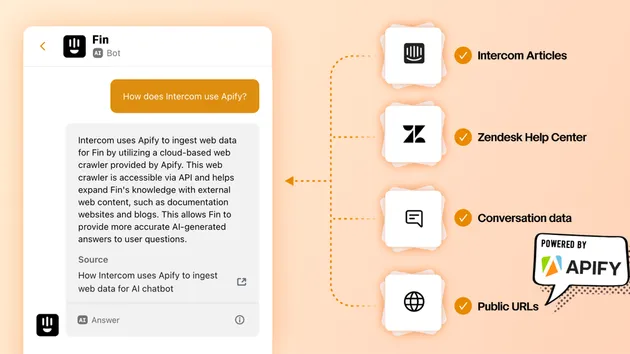
Get Categories and Articles from any public Intercom Help Center. It's fast and costs little.

Developer
Maintained by Community

Actor Metrics

  • 1 monthly user

  • No reviews yet

  • 1 bookmark

  • >99% runs succeeded

  • Created in Aug 2023

  • Modified a year ago

You can access the Intercom Help Center programmatically from your own applications by using the Apify API. You can also choose the language preference from below. To use the Apify API, you’ll need an Apify account and your API token, found in Integrations settings in Apify Console.

1# Start Server-Sent Events (SSE) session and keep it running
2curl "https://actors-mcp-server.apify.actor/sse?token=<YOUR_API_TOKEN>&actors=canadesk/intercom"
3
4# Session id example output:
5# event: endpoint
6# data: /message?sessionId=9d820491-38d4-4c7d-bb6a-3b7dc542f1fa

Using Intercom Help Center via Model Context Protocol (MCP) server

MCP server lets you use Intercom Help Center within your AI workflows. Send API requests to trigger actions and receive real-time results. Take the received sessionId and use it to communicate with the MCP server. The message starts the Intercom Help Center Actor with the provided input.

1curl -X POST "https://actors-mcp-server.apify.actor/message?token=<YOUR_API_TOKEN>&session_id=<SESSION_ID>" -H "Content-Type: application/json" -d '{
2  "jsonrpc": "2.0",
3  "id": 1,
4  "method": "tools/call",
5  "params": {
6    "arguments": {
7      "subdomain": "intercom",
8      "lang": "en",
9      "proxy": {
10            "useApifyProxy": true
11      }
12},
13    "name": "canadesk/intercom"
14  }
15}'

The response should be: Accepted. You should received response via SSE (JSON) as:

1event: message
2data: {
3  "result": {
4    "content": [
5      {
6        "type": "text",
7        "text": "ACTOR_RESPONSE"
8      }
9    ]
10  }
11}

Configure local MCP Server via standard input/output for Intercom Help Center

You can connect to the MCP Server using clients like ClaudeDesktop and LibreChat or build your own. The server can run both locally and remotely, giving you full flexibility. Set up the server in the client configuration as follows:

1{
2  "mcpServers": {
3    "actors-mcp-server": {
4      "command": "npx",
5      "args": [
6        "-y",
7        "@apify/actors-mcp-server",
8        "--actors",
9        "canadesk/intercom"
10      ],
11      "env": {
12        "APIFY_TOKEN": "<YOUR_API_TOKEN>"
13      }
14    }
15  }
16}

You can further access the MCP client through the Tester MCP Client, a chat user interface to interact with the server.

To get started, check out the documentation and example clients. If you are interested in learning more about our MCP server, check out our blog post.