Newsletter Agent
This Actor is paid per event
Newsletter Agent
This Actor is paid per event
An AI-powered Apify actor that generates well-structured newsletters using a crew of specialized AI agents. The system uses CrewAI to coordinate multiple agents that research, write, and edit newsletter content based on user input.
Actor Metrics
2 monthly users
No reviews yet
1 bookmark
>99% runs succeeded
Created in Mar 2025
Modified 9 hours ago
Newsletter AI Agent
An AI-powered Apify actor that generates well-structured newsletters using a crew of specialized AI agents. The system uses CrewAI to coordinate multiple agents that research, write, and edit newsletter content based on user input.
Documentation
Features
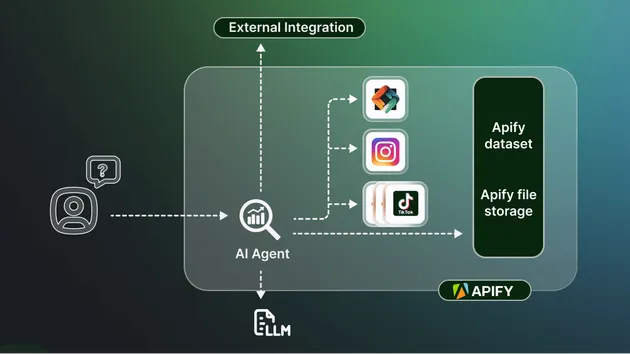
- Multi-agent System: Uses CrewAI to coordinate specialized agents for research, writing, and editing
- Apify Integration: Leverages Apify actors for efficient web scraping and data collection
- Comprehensive Research: Gathers information from multiple sources:
- Google Search results
- Latest news articles
- Reddit discussions
- Twitter/X posts
- YouTube videos
- Intelligent Processing: Transforms raw data into well-structured newsletters
- Markdown Output: Delivers clean, formatted content ready for distribution
- Configurable Sections: Customize newsletter structure and content focus
Architecture
1graph TD 2 subgraph "User Interface" 3 A[Apify Actor Input] --> B[main.py] 4 end 5 6 subgraph "Core System" 7 B --> C[NewsletterCrew] 8 C --> D[Agent Orchestration] 9 end 10 11 subgraph "Agents" 12 D --> E[Researcher Agent] 13 D --> F[Writer Agent] 14 D --> G[Editor Agent] 15 end 16 17 subgraph "Tools" 18 E --> H[Google Search Tool] 19 E --> I[Reddit Tool] 20 E --> J[Twitter Tool] 21 E --> K[YouTube Tool] 22 E --> L[Google News Tool] 23 end 24 25 subgraph "Apify Integration" 26 H --> M[Apify Actors] 27 I --> M 28 J --> M 29 K --> M 30 L --> M 31 M --> N[Web Data] 32 end 33 34 subgraph "Output" 35 G --> O[Newsletter Content] 36 O --> P[Apify Actor Output] 37 end 38 39 classDef default fill:#F3F4F6,stroke:#D1D5DB,color:#1F2937 40 classDef core fill:#E5E7EB,stroke:#9CA3AF,color:#111827 41 classDef highlight fill:#DBEAFE,stroke:#93C5FD,color:#1E40AF 42 classDef agents fill:#FCE7F3,stroke:#F9A8D4,color:#9D174D 43 classDef tools fill:#D1FAE5,stroke:#6EE7B7,color:#065F46 44 classDef apify fill:#E0F2FE,stroke:#7DD3FC,color:#0C4A6E 45 46 class B,C,D core; 47 class E,F,G agents; 48 class H,I,J,K,L tools; 49 class M,N apify;
Prerequisites
- Python 3.10+
- Apify API key
- Google API key for Gemini Pro
- Apify CLI (for local development)
Environment Setup
- Clone the repository:
1git clone https://github.com/pratik-dani/newsletter-ai-agent.git 2cd newsletter-agent
- Install Apify CLI:
npm install -g apify-cli
- Create and activate virtual environment:
1python -m venv venv 2source venv/bin/activate # On Windows, use `venv\Scripts\activate`
- Install dependencies:
pip install -r requirements.txt
- Configure environment variables in
.env
:
1APIFY_API_KEY=your_apify_api_key_here 2GOOGLE_API_KEY=your_google_api_key_here
Usage
Local Development
- Run the actor locally:
apify run
- Test with custom input by modifying
storage/key_value_stores/default/INPUT.json
:
1{ 2 "topic": "Your newsletter topic here" 3}
Apify Platform Deployment
- Login to Apify:
apify login
- Deploy the actor:
apify push
Input Schema
1{ 2 "topic": { 3 "title": "Newsletter Topic", 4 "type": "string", 5 "description": "Topic or requirements for the newsletter", 6 "editor": "textfield" 7 } 8}
Example input:
1{ 2 "topic": "Latest developments in quantum computing, focusing on breakthroughs, industry news, and practical applications" 3}
Output Format
The actor outputs a dataset containing:
1{ 2 "topic": "string", 3 "content": "markdown formatted newsletter content", 4 "status": "success|error", 5 "timestamp": "ISO 8601 datetime" 6}
Project Structure
1newsletter-agent/ 2├── .actor/ # Actor configuration 3├── docs/ # Documentation 4├── src/ 5│ ├── agents/ # AI agent implementations 6│ │ ├── researcher.py # Research agent 7│ │ ├── writer.py # Content writer 8│ │ └── editor.py # Editor 9│ ├── config/ # Configuration 10│ ├── tools/ # Apify integration tools 11│ ├── newsletter_crew.py # Agent orchestration 12│ └── main.py # Entry point 13├── tests/ # Test suite 14├── requirements.txt # Python dependencies 15└── README.md
Contributing
- Fork the repository
- Create your feature branch (
git checkout -b feature/amazing-feature
) - Commit your changes (
git commit -m 'Add amazing feature'
) - Push to the branch (
git push origin feature/amazing-feature
) - Open a Pull Request
License
This project is licensed under the MIT License - see the LICENSE file for details.