Newsletter Agent
This Actor is paid per event
Newsletter Agent
This Actor is paid per event
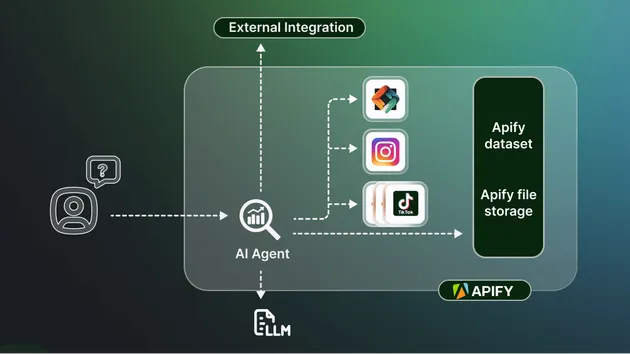
An AI-powered Apify actor that generates well-structured newsletters using a crew of specialized AI agents. The system uses CrewAI to coordinate multiple agents that research, write, and edit newsletter content based on user input.
Actor Metrics
2 monthly users
No reviews yet
1 bookmark
>99% runs succeeded
Created in Mar 2025
Modified 16 hours ago
You can access the Newsletter Agent programmatically from your own applications by using the Apify API. You can also choose the language preference from below. To use the Apify API, you’ll need an Apify account and your API token, found in Integrations settings in Apify Console.
1# Start Server-Sent Events (SSE) session and keep it running
2curl "https://actors-mcp-server.apify.actor/sse?token=<YOUR_API_TOKEN>&actors=pratikdani/newsletter-agent"
3
4# Session id example output:
5# event: endpoint
6# data: /message?sessionId=9d820491-38d4-4c7d-bb6a-3b7dc542f1fa
Using Newsletter Agent via Model Context Protocol (MCP) server
MCP server lets you use Newsletter Agent within your AI workflows. Send API requests to trigger actions and receive real-time results. Take the received sessionId
and use it to communicate with the MCP server. The message starts the Newsletter Agent Actor with the provided input.
1curl -X POST "https://actors-mcp-server.apify.actor/message?token=<YOUR_API_TOKEN>&session_id=<SESSION_ID>" -H "Content-Type: application/json" -d '{
2 "jsonrpc": "2.0",
3 "id": 1,
4 "method": "tools/call",
5 "params": {
6 "arguments": {},
7 "name": "pratikdani/newsletter-agent"
8 }
9}'
The response should be: Accepted
. You should received response via SSE (JSON) as:
1event: message
2data: {
3 "result": {
4 "content": [
5 {
6 "type": "text",
7 "text": "ACTOR_RESPONSE"
8 }
9 ]
10 }
11}
Configure local MCP Server via standard input/output for Newsletter Agent
You can connect to the MCP Server using clients like ClaudeDesktop and LibreChat or build your own. The server can run both locally and remotely, giving you full flexibility. Set up the server in the client configuration as follows:
1{
2 "mcpServers": {
3 "actors-mcp-server": {
4 "command": "npx",
5 "args": [
6 "-y",
7 "@apify/actors-mcp-server",
8 "--actors",
9 "pratikdani/newsletter-agent"
10 ],
11 "env": {
12 "APIFY_TOKEN": "<YOUR_API_TOKEN>"
13 }
14 }
15 }
16}
You can further access the MCP client through the Tester MCP Client, a chat user interface to interact with the server.
To get started, check out the documentation and example clients. If you are interested in learning more about our MCP server, check out our blog post.